Data Validation
MS Excel data validation feature allows you to set up certain rules that dictate what can be entered into a cell. For example, you may want to limit data entry in a particular cell to whole numbers between 0 and 10. If the user makes an invalid entry, you can display a custom message as shown below.
Validation Criteria
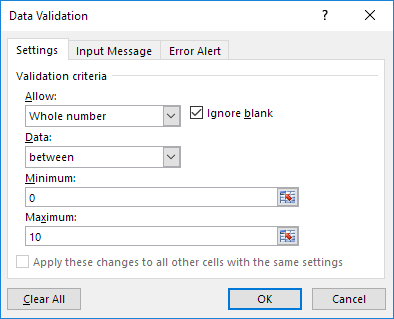
To specify the type of data allowable in a cell or range, follow the steps below, which shows all the three tabs of the Data Validation dialog box.
- Select the cell or range.
- Choose Data » Data Tools » Data Validation. Excel displays its Data Validation dialog box having 3 tabs settings, Input Message and Error alert.
Data Validation Example
In this example, we restrict users to enter a whole number between 0 and 10.
Create a Data Validation Rule
To create the data validation rule, execute the following steps.
1. Select cell C2.
2. On the Data tab, in the Data Tools group, click Data Validation.

On the Settings tab:
3. In the Allow list, click Whole number.
4. In the Data list, click between.
5. Enter the Minimum and Maximum values.

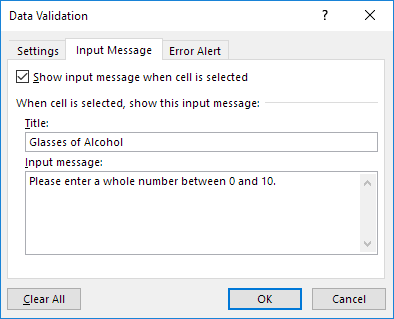
Input Message
Input messages appear when the user selects the cell and tell the user what to enter.
On the Input Message tab:
1. Check 'Show input message when cell is selected'.
2. Enter a title.
3. Enter an input message.

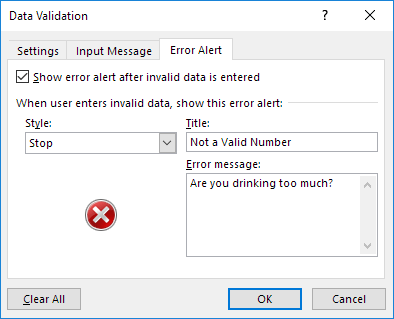
Error Alert

4. Click OK.
Data Validation Result
1. Select cell C2.

2. Try to enter a number higher than 10.
Result:

Note: to remove data validation from a cell, select the cell, on the Data tab, in the Data Tools group, click Data Validation, and then click Clear All.
Keep checking the blog for more updates on Excel tutorial.


Comments
Post a Comment